Adventure School participates in the Amazon Services LLC Associates Program, an affiliate advertising program for sites to earn advertising fees by advertising and linking to amazon.com
If you’re only going to learn three knots for canyoneering, the munter mule should be one of them. (The other two should be the water knot and the prusik.)
What’s the Munter mule?
The primary use of the Munter mule in canyoneering is as a contingency anchor.
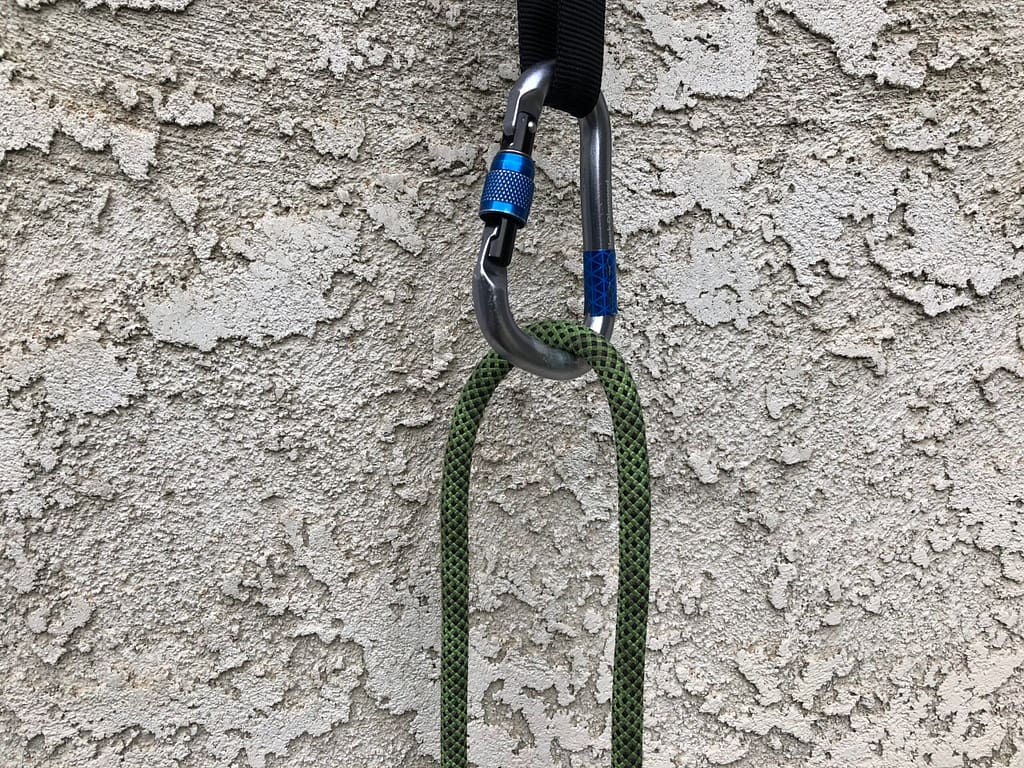
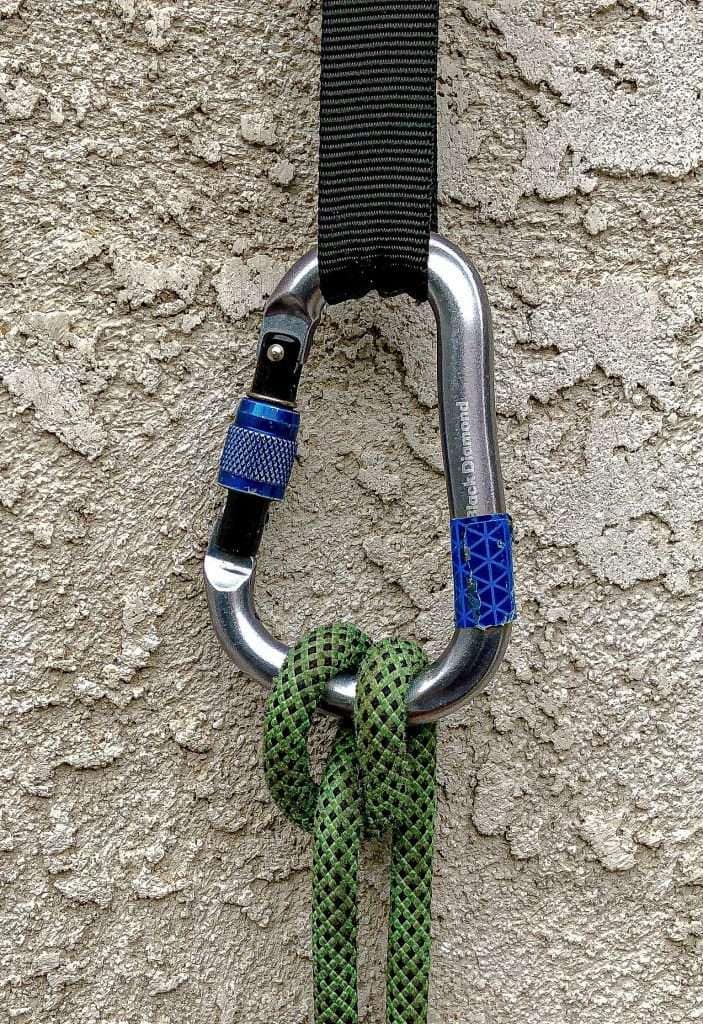
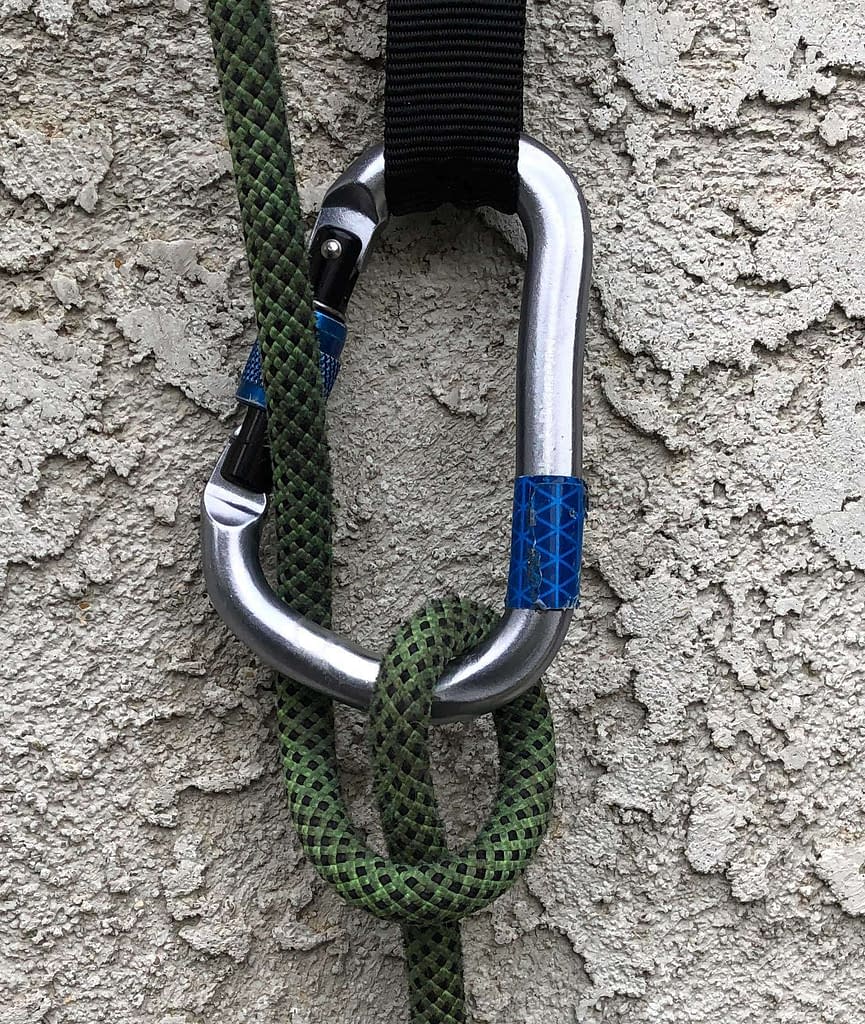
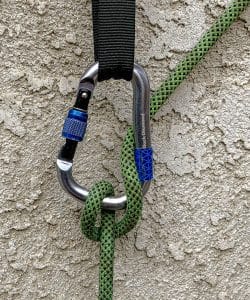
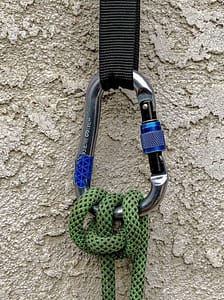
The Munter mule is actually made of two or three separate hitches or knots. The munter hitch at the core provides friction, followed by a mule hitch to lock off the system. A safety knot or hitch is added on top to prevent the mule hitch from failing. The safety is often an overhand knot but other methods are used too.
Let’s first look at the Munter hitch.
The Munter hitch, also known as the Italian hitch or the Crossing hitch,[1] is rumored to have been introduced to the climbing and mountaineering scene by Mr. Werner Munter from use in sailing. Apparently, Mr. Munter felt that a hip belay didn’t offer enough friction and instead used the Italian (now Munter) hitch.

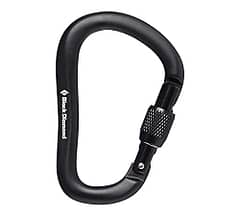
The Munter hitch creates friction by making the rope rub on itself and the carabiner. This friction acts similarly to a rappel device but only requires a carabiner. Typically an HMS carabiner that was designed specifically for the Munter hitch is used.
Interesting fact: HMS carabiners were made in Germany specifically to allow the smooth use of the munter hitch. HMS stands for Halbmastwurfsicherung, meaning half-clove hitch belay in German.
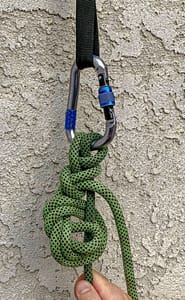
The second part of the Munter mule is the mule hitch. This is tied on top of the Munter to lock off the rope even when under load. Using the brake strand, you form a half hitch around the load strand. The collar formed by the half hitch cinches the rope tight.
The final piece is to secure the loop coming out of the half hitch since it’s really just a slip knot and if it gets pulled loose, whatever’s on the load end of the rope will drop.
Typically an overhand knot is tied using the loop coming out of the mule hitch to lock off the system, but we’ll look at some other options in a bit.
So that’s the Munter mule. Now let’s dig in and learn how to tie and use it.
-
 Rocklock Screwgate Carabiner$14.95
How do you tie a Munter mule?
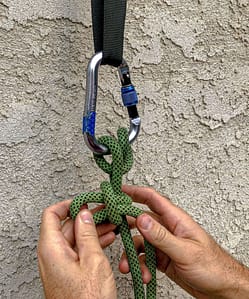
To tie the Munter on an HMS carabiner, follow these steps:
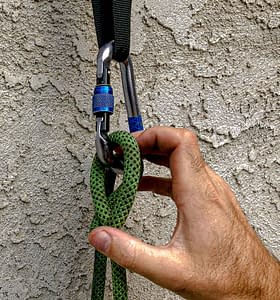
- Clip the rope through the gate of an HMS carabiner clipped to the anchor (shown above)
2. Set the rope length for the rappel
3. Grab the brake strand and flip the rope upward to make a loop
4. Pull the loop into the brake strand coming from the biner and clip the loop through the biner
5. Check your knot by rolling it in both directions to ensure it flips and that it’s actually a Munter
6. Lock the carabiner
7. Form a bight with the free strand with the tail going behind the load strand
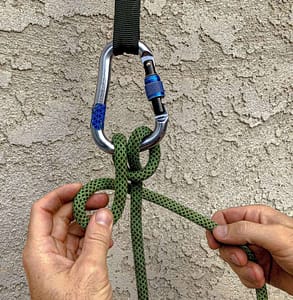
8. Form a loop in the tail of the free strand
9, Pass the second loop over the top of the load strand and pass it through the first loop
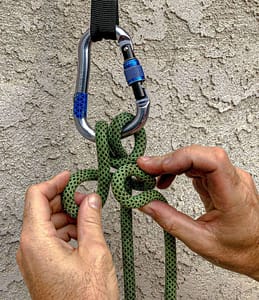
10. Pull the loop tight
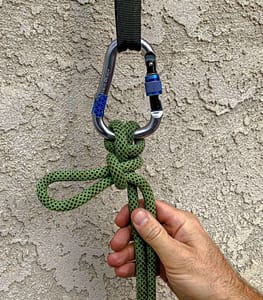
11. Pull out the first loop and tie an overhand on a bight around the load strand with the loop
Note: use an automatic or semi-automatic biner for rappels, to reduce the chance of the rope opening the screw gate.
Note: the loaded end only auto-blocks once the mule snugs up to the carabiner, so prep for a few inches of play in the system before the mule auto-blocks.
When rigging for canyoneering, I typically build my anchor master point, then clip the biner to it and run a rope through it. I set the rope length so both ends reach the ground. I tie the mule hitch and safety knot and then stow the non-rappelling end of the rope in a rope bag at the top of the drop. This ensures nobody rappels off the wrong end of the rope.
Everyone rappels from the munter except for the last person at risk (LaPAR). The last person will re-rig the anchor to a retrievable setup. I typically convert to a simple double-strand throw and go in dry canyons.
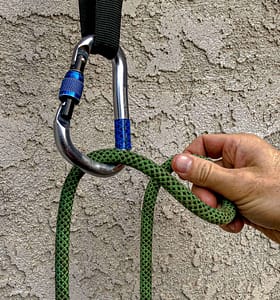
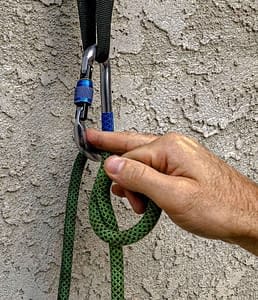
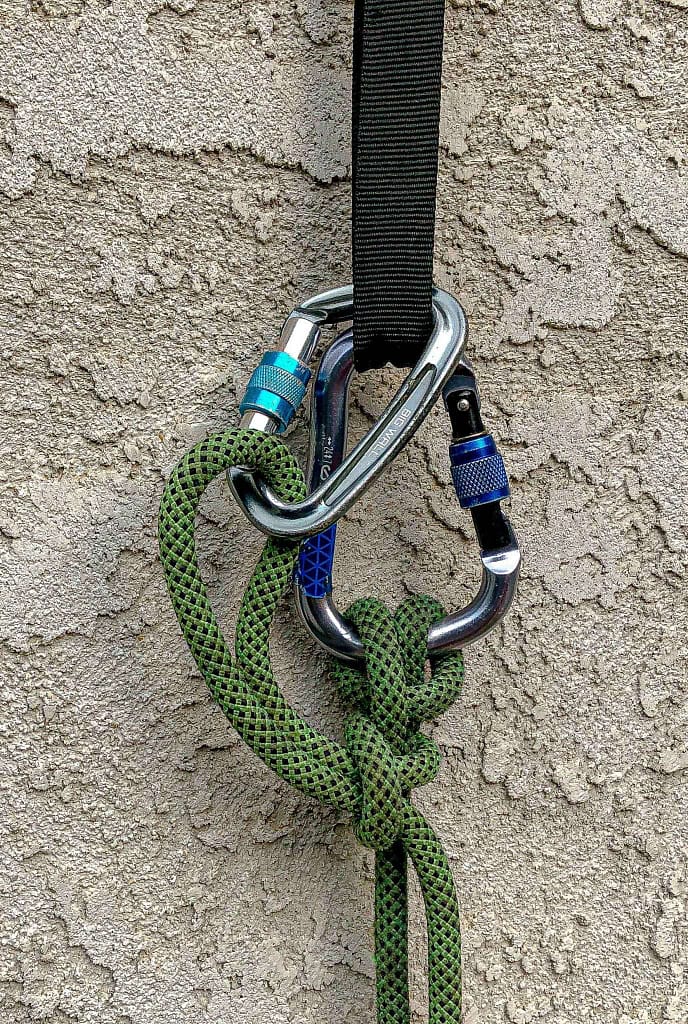
Alternatives for Tying-Off:
The most common method for securing the mule hitch is with an overhand knot, but other methods work as well. On the right is a biner clipped to the secure master point securing the rigging.
When do you use it?
The Munter is used primarily when rigging a rappel for a group. Some will argue that a Munter takes too long to bother with for small rappels, experienced groups, or anytime at all for that matter, but I disagree. I believe a Munter (or another contingency rigging) should be the default rigging. Too many things can go wrong on rappel. Here are just a few:
- Hair or clothing getting stuck in the belay device
- ropes not reaching the ground
- knotted or tangled ropes
- panicked or injured rappeller
- malfunctioning equipment
- rigging a secondary pull anchor
- spotting the rope on the end of an overhung rappel
(Read: How to not die while canyoneering)
I’d say that these situations happen more than just on short rappels or for beginners. Using contingency rigging is similar to the principle of redundancy we apply to other unpredictable situations. The Munter mule is a simple, reliable, and versatile contingency rigging that every canyoneer should learn.
How to use the Munter Mule
If someone gets stuck on rappel (hair or clothing stuck in rappel device, girth hitch on figure eight, scared rappeller, etc.), then the person at the top should take the following actions to lower the stuck rappeller:
- Untie the safety overhand.
- Pull the bight left from the overhand through with one hand on the brake line and the other inside the loop until the loop is small.
- Now with both hands on the brake line, pull the brake line until the mule hitch releases.
- Lower the rappeller to the ground using the Munter hitch.
Read a story of hair getting stuck in a rappel device
Braking: To brake, bring the two strands parallel to each other — i.e., pull the brake end alongside the load strand. To apply less friction, move the brake strand out at an angle to the load strand.
Features and advantages of the Munter hitch
One very useful aspect of the munter is its reversibility; it can be pulled from either side of the rope and it still works just as effectively. The munter hitch is a self-regulating hitch. The heavier the load the tighter the bends in the hitch become and therefore creating more friction and self-regulating.
Note that you have better control and more friction when you pull down (toward the rappeller) on the brake line than when pulling up (toward the anchor). For this reason, it’s better to hold the portion of the brake line between the carabiner and the quick link than the portion between the quick link and the rope bag.

Note: The above pictures show the Munter tied on non-HMS carabiners. This will still work, but the Munter won’t be as smooth or easy to use with the one section of rope being pinched into the spine of the biner.
Limitations and disadvantages of the Munter mule as an anchor
The Munter mule is a great tool to have in your toolbelt, but you should definitely know when it isn’t going to work for you. Here are a few limitations of the Munter mule:
- You cannot rappel double-stranded.
- You cannot isolate strands (i.e. have one person getting ready while the other person is rappelling)
- The rope must be re-rigged for the LaPAR.
- An HMS carabiner is required
Also note, when the Munter hitch is used to belay, it can twist the rope and fuzz up the rope sheath. (see below for how to reduce twisting)
(Read: How to choose a canyoneering rope)
Other considerations
Friction:
The Munter provides good friction, but it can vary depending on several factors:
- User experience.
- Rappeler weight.
- Rope type, condition, diameter, moisture etc.
- The shape, size, and other attributes of the hardware used with the Munter Hitch.
Under normal canyoneering conditions, the normal Munter provides sufficient friction to control a descent, but just like any good canyon descender, the friction of the Munter is highly adjustable if you know what you’re doing.
The brake line position is the primary way to control friction with the Munter. Parallel brake and load strands give maximum friction. Moving the brake strand back behind the carabiner and away from the load strand provides much less friction.
The Super Munter
When lowering a heavy load or when you need extra friction, an additional turn makes the Super Munter. The added turn through the carabiner provides extra friction and will also counter the twisting of the rope. You must rig the Super Munter before loading the rope.
The Super Munter also works well when using thin rope.
Spine-side or gate-side?
Climbers teach the positioning of the brake rope in relation to the carabiner gate is important. This is because climbers are more likely to move the position of the brake strand while descending. I rarely move the brake strand anywhere but near parallel to the anchor when canyoneering, but if I did want to move it up and behind the carabiner, the position may matter more.
To avoid rubbing the rope against the gate of the carabiner, tie the hitch so the brake rope exits along the spine and not the gate side of the biner. If the brake rope exits across the gate of the carabiner then a few things can occur:
- The movement of the rope across the gate mechanism could unlock and open the gate.
- The gate mechanism may have sharp edges that could catch on and damage the rope.

If you tie it with the brake rope on the gate side then you simply need to keep the rope clear of the gate mechanism.
Twisting
Using the Munter to lower will most certainly twist and kink your rope. This will vary with subtle changes in hand position but it is unavoidable. One suggested way to at least reduce the twists is to hold the brake line tight in one hand preventing it from twisting as you lower one arm’s length. Then grab the rope with the other hand right below the first hand and ensure no twists are present as you slide this hand down a bit before lowering another length of untwisted rope and then repeating. It’s not perfect, but it will keep the twists out of your way as you lower and push them out into the system where they can be shaken out after the rappeler is off rope.
Conclusion
The Munter Hitch and Munter mule contingency anchor can potentially turn an ugly situation into a simple lower. Always bring it in your technical canyon toolset. With sufficient knowledge, practice, and experience it can be used for everything from descending and belaying right through to lowering a two-person rescue load.
If you’ve used the munter in the field and have additional tips, share the love in the comments below.
Thanks very much for the high quality and results-oriented info on canyoneering. Keep up the great work.
Glad to hear it was helpful.