Adventure School participates in the Amazon Services LLC Associates Program, an affiliate advertising program for sites to earn advertising fees by advertising and linking to amazon.com
This is a long and detailed post about all things top-rope climbing. You may not need to read the entire thing so here’s a table of contents to get you where you want to be quickly.
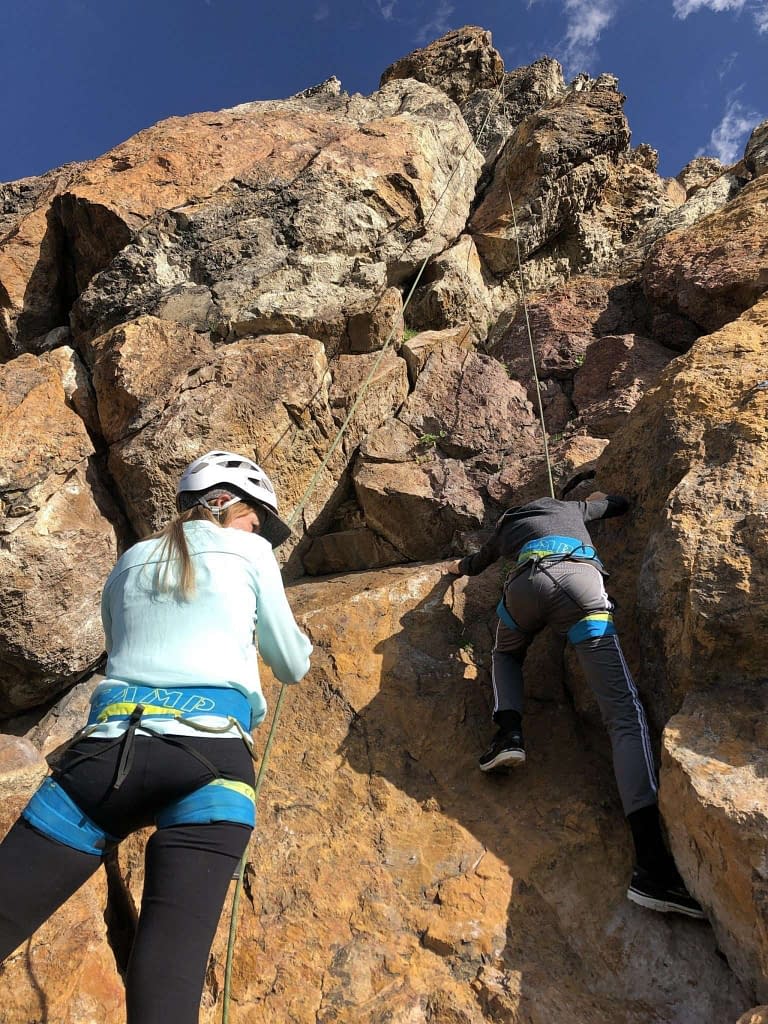
Top rope climbing is where the rope is always anchored above the climber. If at any point the climber were to lose their hold, they wouldn’t fall more than a short distance since the rope is kept tight by the belayer. It’s a mentally and physically easier way to climb than lead climbing.

If you’ve been to the climbing gym, you’ve seen top-rope climbing. It’s a great way for the uninitiated who’ve never felt the snug hug of a harness to get on the rock because it takes less skill while climbing and is generally safer. Most top-rope anchors can be reached through non-technical means, like hiking or scrambling.

Top rope climbing is also excellent for practicing hard routes, learning new techniques, building strength and endurance, or practicing lead climbing without the risks.
Not all routes can be top roped. Only when the top of the route is accessible without having to climb (or if you have someone who can lead climb the route), can you safely top rope climb.
A typical top rope climbing session:
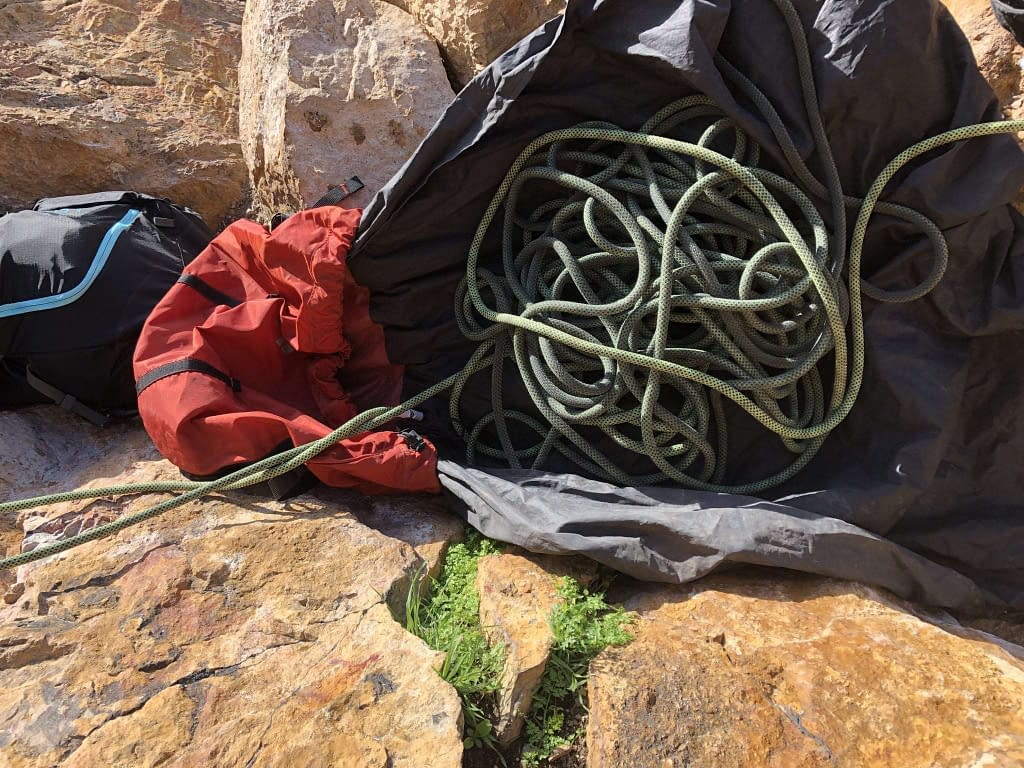
Top rope equipment
It will cost you about $300 to get all the gear you need to start top-rope climbing. Here’s the basic gear you’ll need:
- Rope
- a large diameter (>= 10mm) semi-static rope (or low-stretch rope) is ideal if you plan to do a lot of top rope climbing. If you want a more versatile rope that you can eventually lead climb on, you’ll want a dynamic rope. I started with this dynamic rope and it served me well for years for both top roping and lead climbing. Top roping can be tough on ropes so a larger diameter rope will give you a longer rope life.
- Helmet
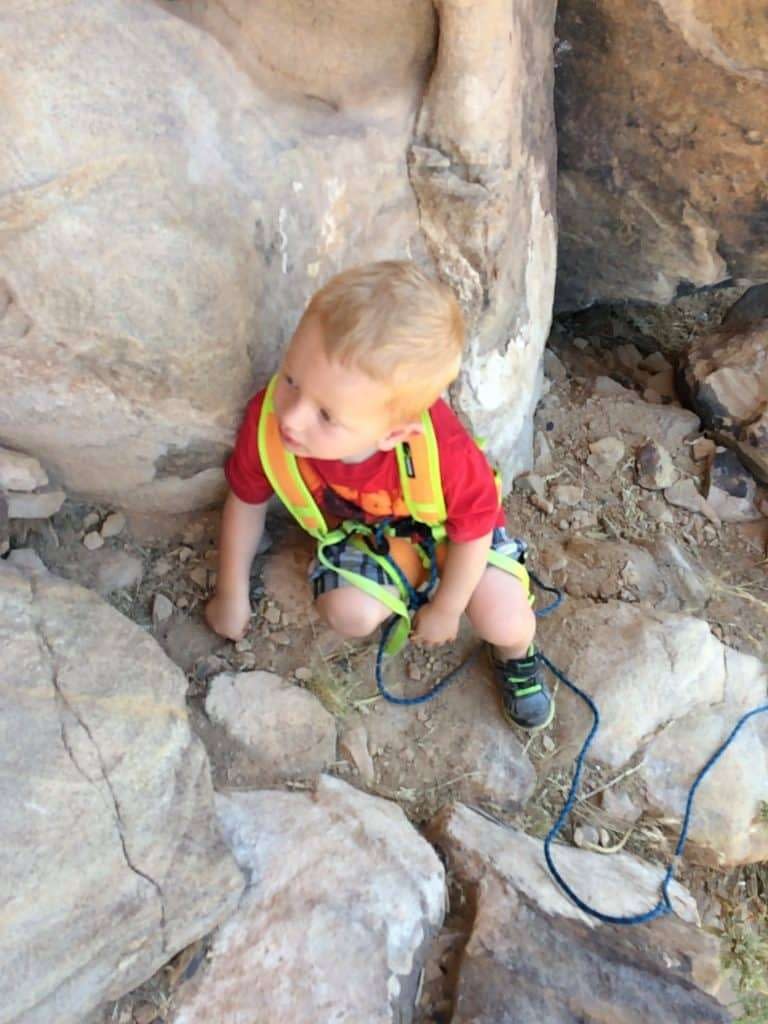
- You’ll see many people at the crag without helmets on, but you’ll never see me connected to a rope without my helmet on. Get a comfortable helmet that you don’t mind wearing and then just put it on when you start your climbing day and don’t worry about it until you’re done climbing. This is an economical helmet that does the job just fine and you can see in all the photos that it’s the one I use.
It’s such an easy thing to do that has a huge upside and little downside. When you’re climbing, even if the rock isn’t loose and chossy, you don’t want to fall and swing into the rock with an unprotected noggin. Also, when belaying, you owe it to your climbing partner to have a helmet on so when a rock falls on your head you don’t pass out and let go of the rope.
Learn why I always wear a helmet when I’m tied to a rope here.
- Harness
- You’ll need at least two harnesses to climb. One for the climber and one for the belayer. Harnesses come in many varieties. For top rope climbing, a basic but comfortable modern sport climbing harness will do great. Here’s the one I’ve been using for many years and am very happy with for top rope and sport climbing.
- Belay Device
- I would recommend getting a Petzl GriGri belay device. The GriGri is an assisted braking device that will keep you much safer than a traditional belay device. While you’re learning the ropes of belaying, this will give you an added layer of protection from error. Tons of other options exist, but I’d recommend learning how to use one of these before you worry about other types.
-
 Black Diamond Men’s Momentum Rock Climbing Harness$64.95
 -
Product on saleBlack Diamond Half Dome HelmetOriginal price was: $65.00.$58.95Current price is: $58.95.
-
Black Diamond ATC Belay Device$19.75
-
9.7 mm Lightning Pro Rope$216.95


- Slings
- Having at least a couple of 120cm slings can be handy to help you out in many situations like rigging your safety or belay anchor.
- Shoes
- Climbing shoes are optional if you’re just getting started, but they can make a huge difference. I picked up several pairs of these La Sportiva Tarantulace shoes in various sizes when they were on sale so I have shoes for people to wear when I invite them out to climb with me.
- Carabiners
- A few locking carabiners like these are a must for setting up anchors and belaying from. I’d start with at least 5 and add from there as you find ones you like. I use HMS biners for belaying and these ones for everything else
- Cordollette
- Having a cordolette of 6 or 7mm nylon cord that’s about 15-20 feet long can come in handy for top rope climbing and is indispensable if you’ll be building any gear anchors with cams or nuts. I usually buy a 30′ length of accessory cord to use for all kinds of things like tying up little tikes when mom and dad are climbing.


- 1″ tubular webbing
- this is for the top rope anchor, safety anchor, or bottom belay anchor. Get at least 30 feet and make sure it’s climbing spec.
- Chalk and chalk bag
- This one is totally optional, but if you get sweaty fingers or hands like me, it will make a big difference.
-
1 inch Nylon Tubular Webbing$19.95
-
Chalk Bag$14.87


Finding and accessing top rope routes
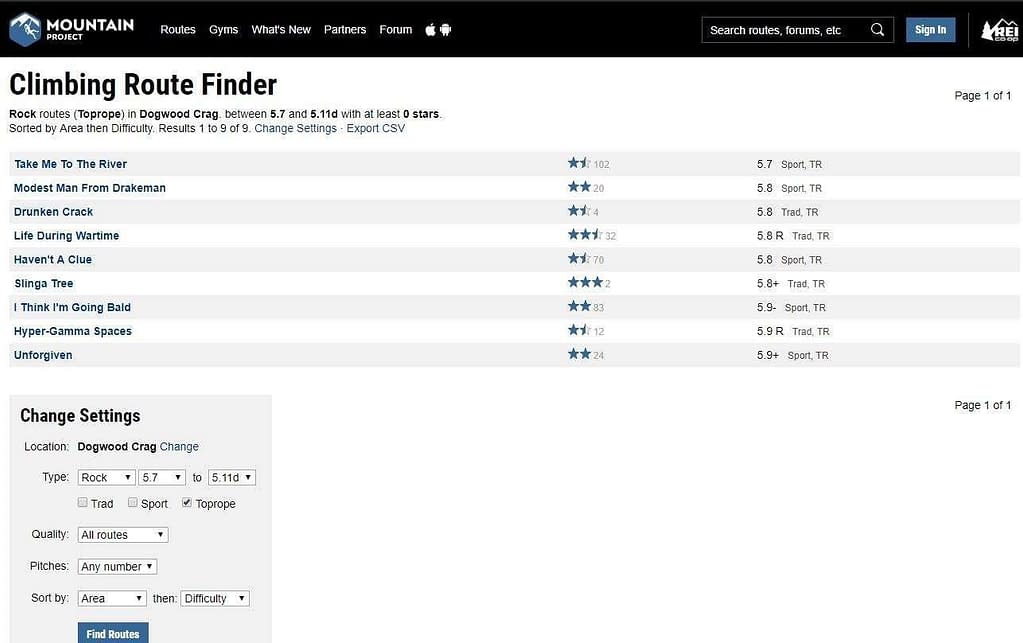
I remember when I was first venturing into the world of outdoor climbing. I’d read about various crags online and only find sport and trad climbing routes. I struggled to find good info on top rope climbing routes for a while until I found Mountain Project. Mountain Project is an awesome resource for finding top rope climbing routes because it lets you filter everything else out.
Once you find a route you want to try, access the bolts by either hiking or scrambling to the top. Before you even set out for the top of the cliff, be sure to put on your harness and helmet. My rule of thumb is to not even get within 8 feet of a cliff edge without a helmet, harness, and safety tether on so it’s easiest and safest to get all your gear set up before you head to the top.
Setting a safety anchor
Once you find the top of your route, a best practice is to rig a safety anchor. This isn’t your climbing anchor, it’s just a quick anchor to keep you from tumbling over the edge of the cliff while you rig your climbing anchor.
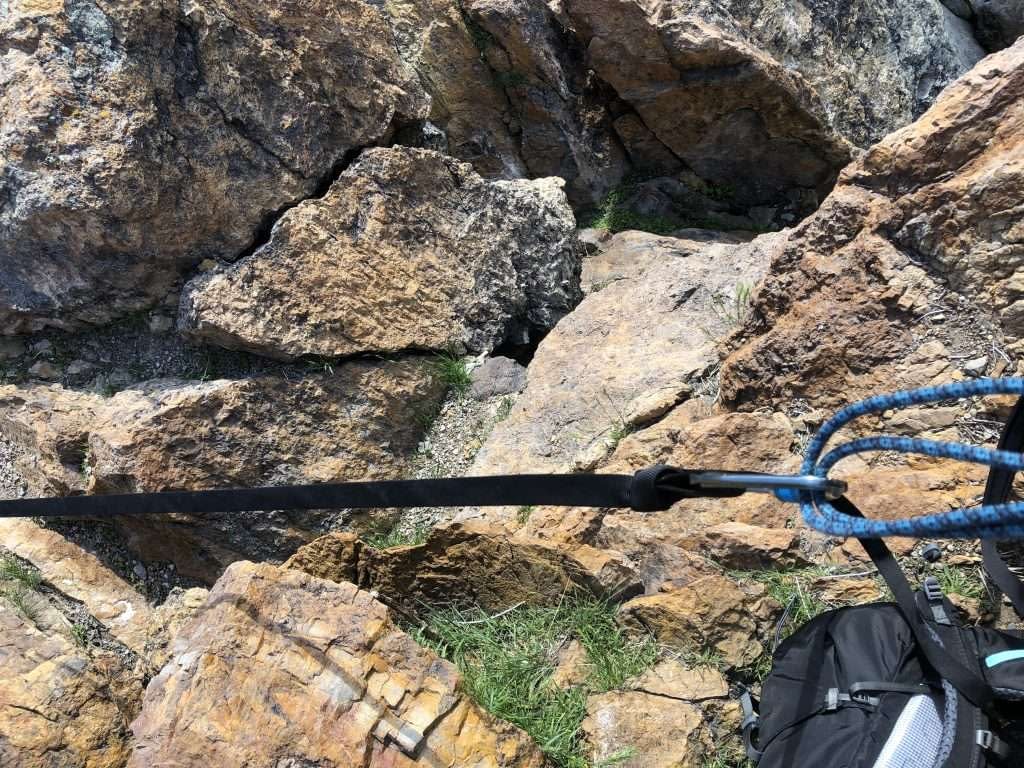
I know many climbers don’t bother to do this but It’s quick and easy and takes away one of the biggest risks you’ll face at the crag. Reaching headfirst down the cliff to clip in your anchor and rope is foolhardy without being fastened in. Yes, you can just clip your personal anchor into the bolts, but that still requires you to hang over the edge without an anchor.
To set a safety anchor, simply find a rock, tree, or other secure object and rig a length of webbing or rope around it using a girth hitch, basket hitch, or one of a dozen other methods.
Depending on the anchor you rigged, tie an overhand on a bight that you can clip your personal tether into that will put you within reach of the climbing anchor without having too much slack.
I like to use a Purcell prusik as my personal tether because it’s infinitely adjustable within the reach of my arm.
Once you’re clipped into the safety, you’re ready to set up the climbing anchor.
Setting a top rope anchor
Top rope climbing anchors seem simple enough, but if you’re transitioning from gym to rock, learning top rope climbing anchors correctly is paramount to staying safe and being confident in your climbing.
Many accidents happen as a result of poor top rope anchor skills and practices. Don’t become an accident!
Principles of anchors
Basic principles of anchor building apply to top rope anchors as well as any other climbing anchors. Many beginners learn to build climbing anchors using acronyms such as SERENE or EARNEST. These acronyms can be helpful as you’re learning, but don’t rely on them alone. I learned using EARNEST, but I use it as more of a guide than a rule. The important thing is to understand why each element is important so you can use them appropriately. You have to know the rules before you can break them, right?

E – Equalization
Ensure each anchor point is being weighted as equally as possible.
A – Angle
The wider the angles, the more load you’re putting on each anchor point
R – Redundant
Ensure no single failed point will result in you plummeting to your death. Have at least two points that need to fail before you fall.
NE – No Extension
If something fails, be sure the anchor won’t get a sudden shock load from a big extension in the system.
S – Solid
Don’t fall into the trap of thinking that 6 sub-optimal anchor points equal one good anchor. Ensure each anchor point is strong, secure, and stable.
T – Timely
You don’t have time to waste when you’re up on the cliff building anchors. Practice at home and get fast at an efficient method that doesn’t take all day to set up.
You’ll likely stay safe if your anchors follow these basics but you won’t always be able to accomplish them all. Do your best and in the least, ensure all your anchor points are solid and you’ve got redundancy. The equalization and non-extending are important, but not as high a priority as having redundant bomber placements to hang on.
Having acute angles is also important to overall strength. A solid placement with wide angles can lead to forces stronger than expected.
If you put a 100 lb load on an anchor here’s what happens to the forces on each leg of a two-point anchor at different angles:
120 degrees – 100 lbs on each anchor point
80 degrees – 70 lbs on each anchor point
40 degrees – 54 lbs on each anchor point
20 degrees – 50 lbs on each anchor point
That’s a 100% increase in weight on each point at 120 degrees!
Types of anchors
Bolts
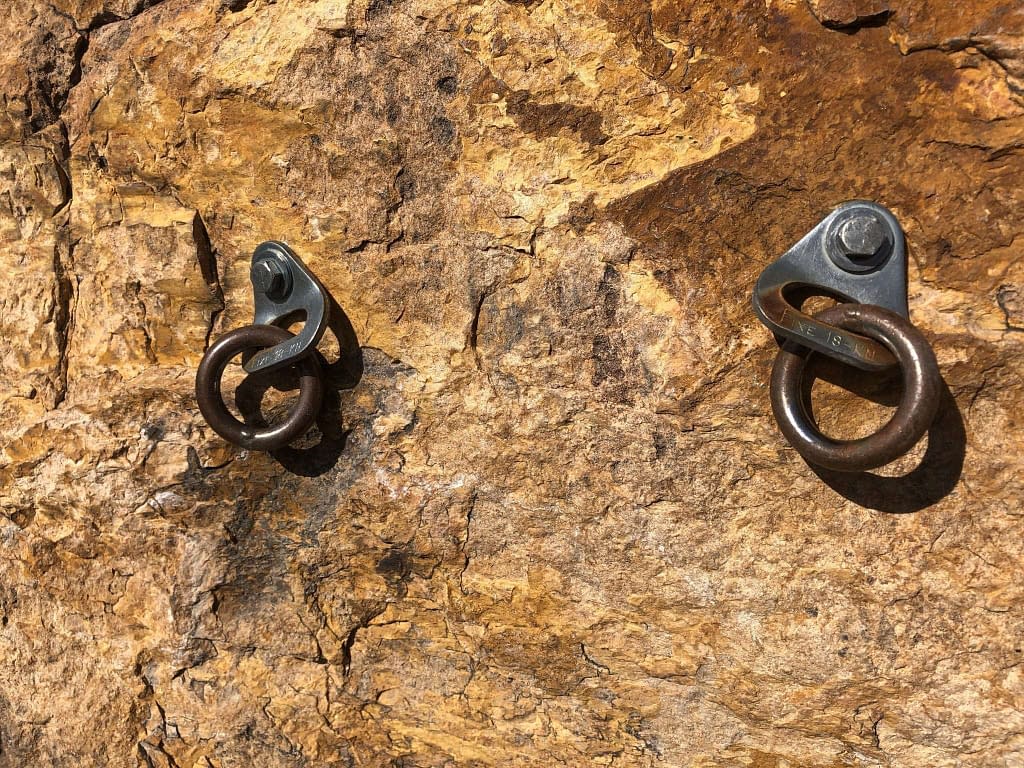
Many top rope crags and sport climbing crags have bolts set at the top of each route.
Before you clip into a set of bolts, be sure to inspect them. Check for rust, loose or broken bolts or major rope wear. If in doubt, move to another route.
Setting up an anchor on bolts is simple and easy. Here are a few of the more common rigging methods.
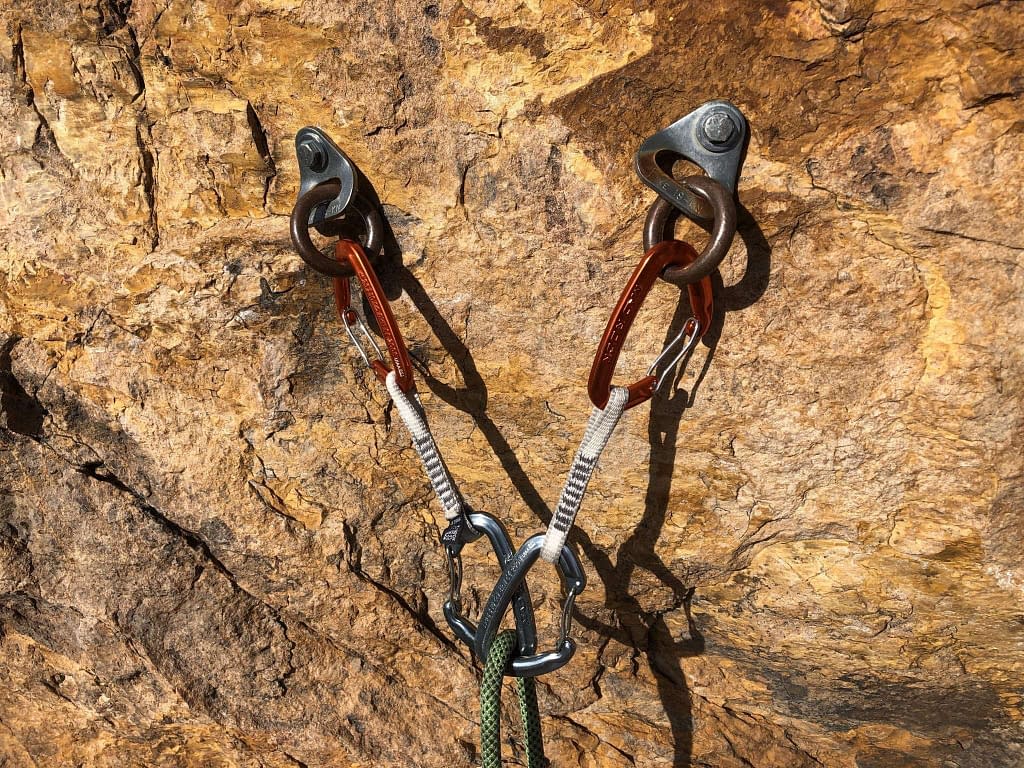
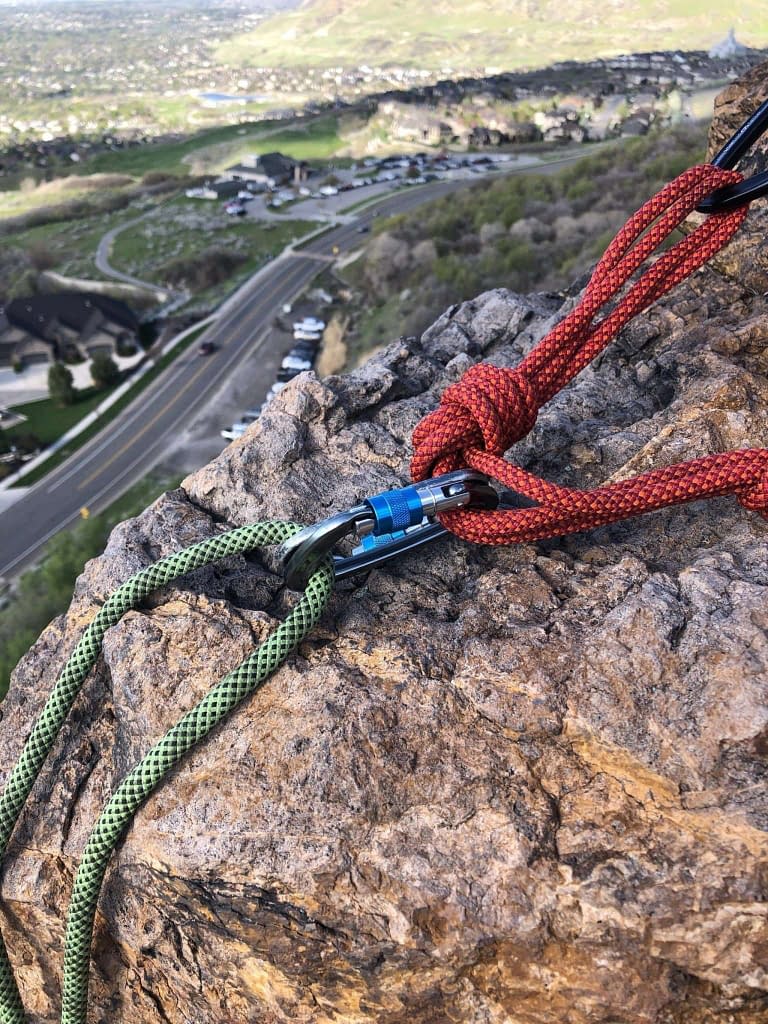
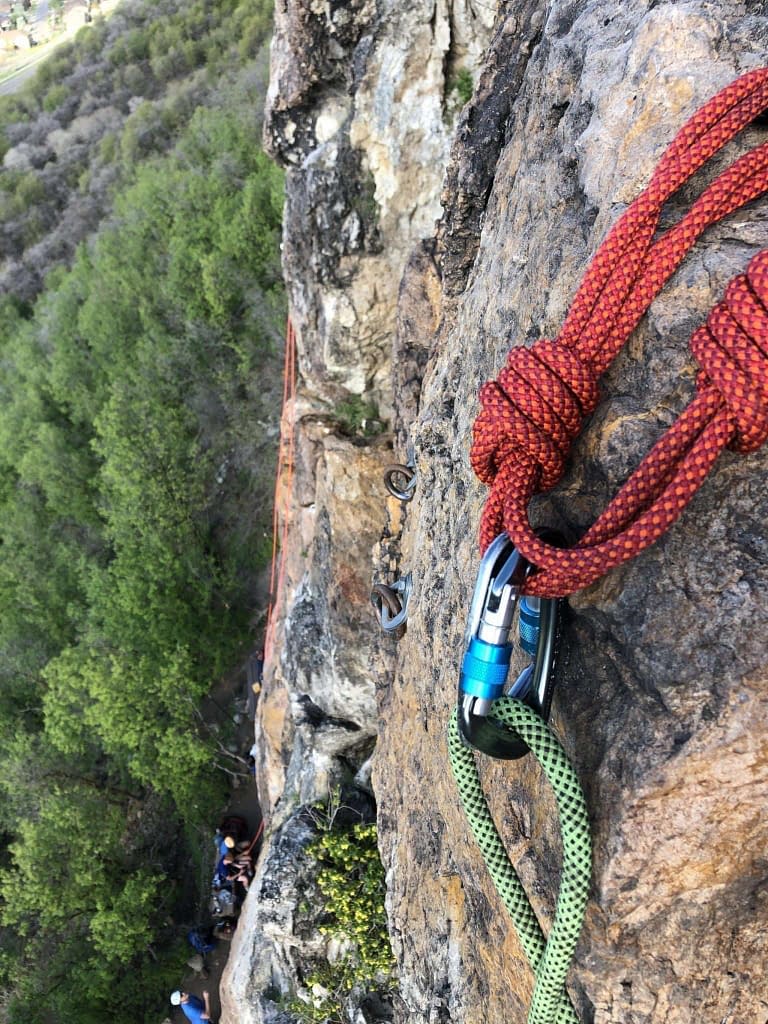
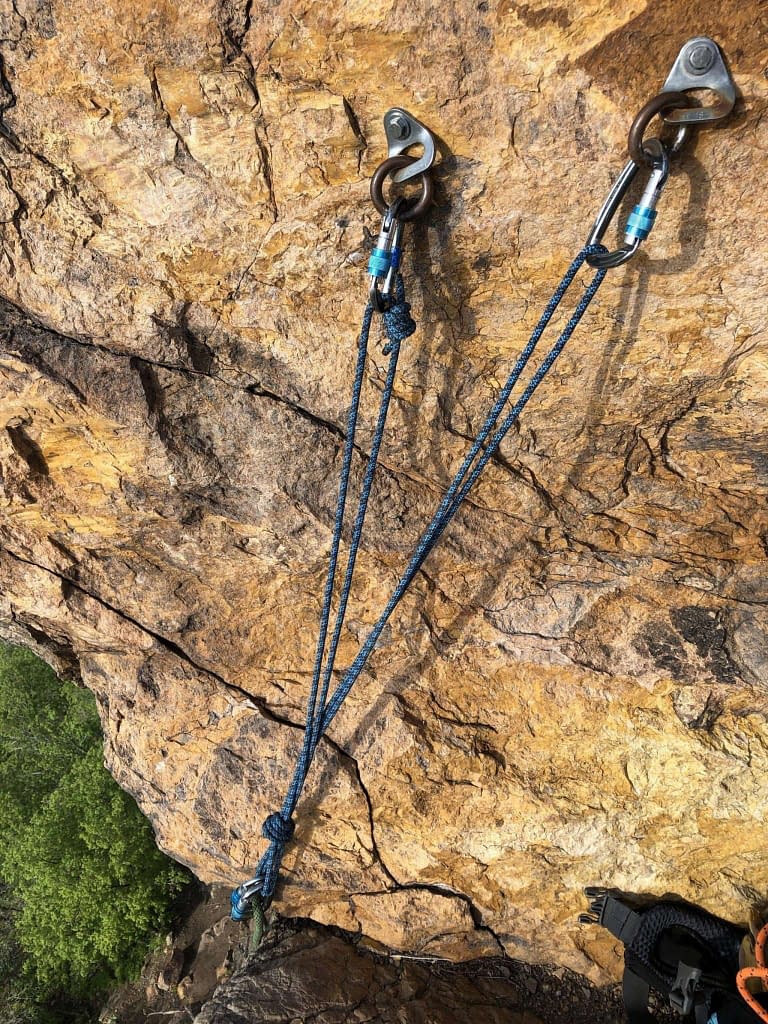
Quad
My preferred top rope anchor method is with a pre-tied quad. Just clip your quad in, clip the rope to the quad, lock your biners, toss the rope, and you’re ready to go.

Draws
If you carry quickdraws, another fast and easy way to rig an anchor is to clip a draw to each bolt or chain link and then clip the rope through the free biner of each draw. Ensure the biner gates are facing out and in opposite directions.
The one reason I don’t use this setup much for top-rope climbing is that the biners don’t have locking gates and I am not able to watch the anchor throughout the climb to ensure the gates aren’t at risk of coming open. You could always swap out the biners for lockers, but I’ve never gone that route.
Slings
If you’ve got two slings on your rack, make a quick anchor by clipping one to each bolt and tie them together in the direction of pull. This gives you a redundant masterpoint to clip two lockers into – opposite and opposed.
This anchor setup is a bit harder to get equalized in the direction of pull, but it can be done.
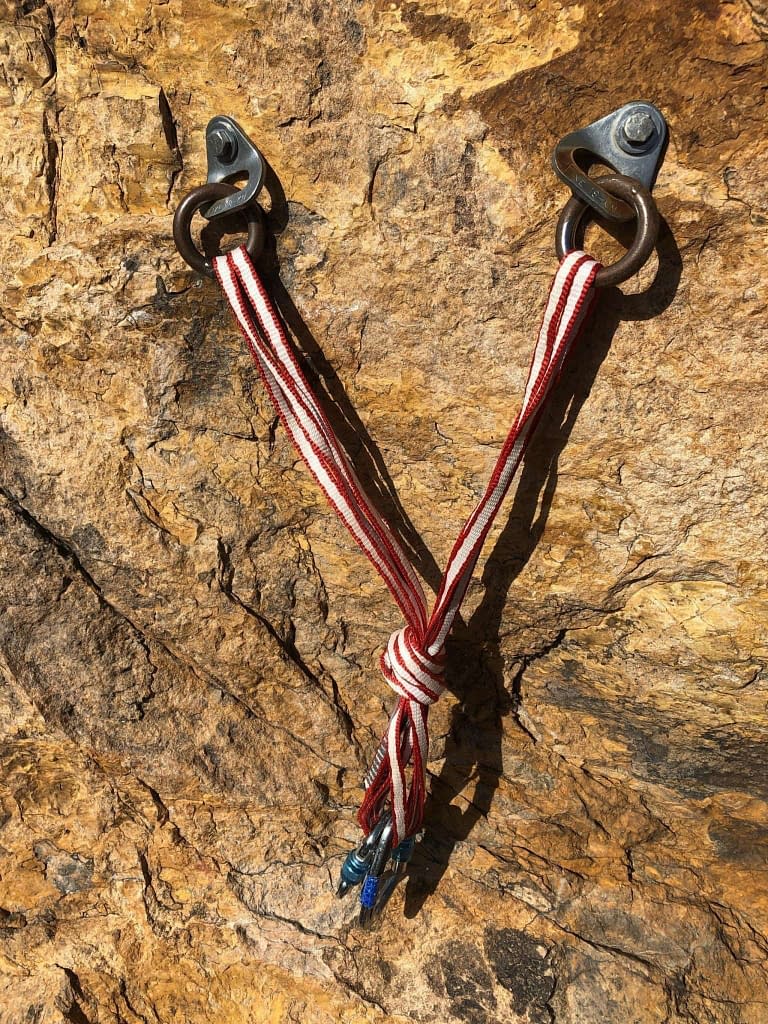
Of all three of these methods, I prefer the quad because I don’t have to worry about equalizing the legs as long as the biners sit roughly in the middle of the space between the knots. With both the draw anchor or the sling anchor, equalizing takes a bit more thinking. I also don’t have to tie any knots while on the cliff with the quad.
This doesn’t mean you shouldn’t learn many methods. Adding tools to your toolbelt gives you options when your one trusty tool doesn’t work in a situation or if you forget to bring the gear you need.
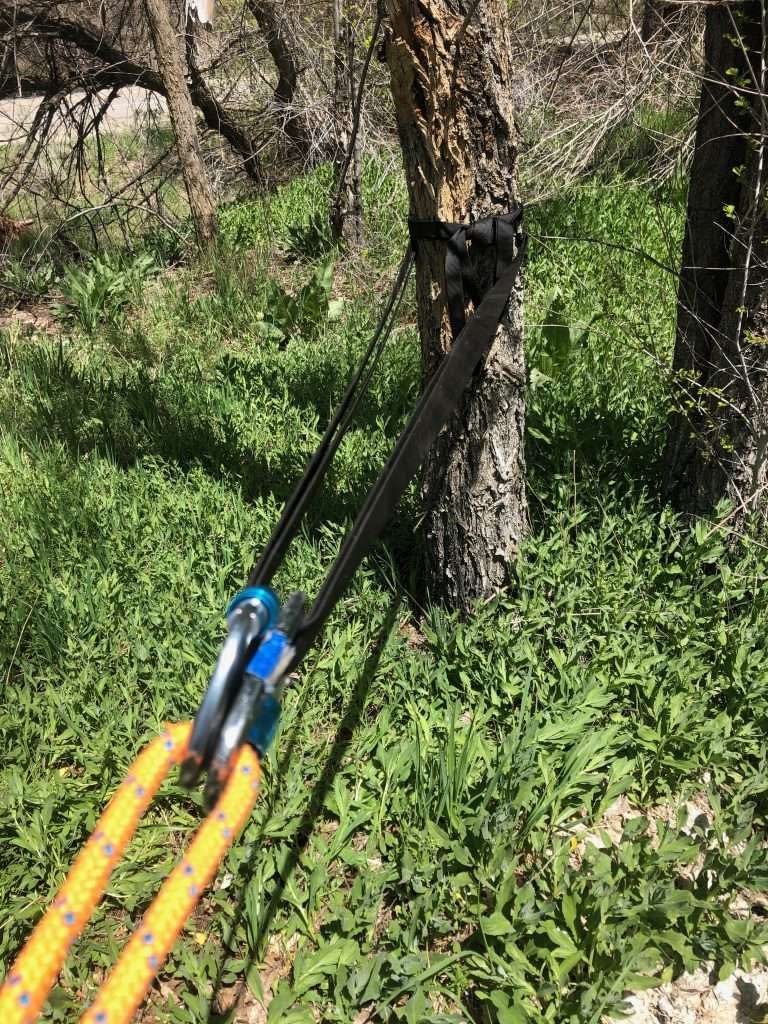
Single point anchor on a tree or large rock
Sometimes a top rope route won’t have fixed bolts on it and you’ll have to set up your own anchor. If you have multiple trees or rocks to anchor to, use them for redundancy, but sometimes you only have one point to hang everything on.
In those cases, a single tree, rock, or other natural feature that can be securely tied off can make a perfectly bomber anchor.
When selecting a tree to anchor from, be sure to choose one that’s alive and healthy and is at least 5 inches in diameter. Also, ensure it has a solid root structure and isn’t loosely anchored in sand.
Typically people use solid trees to anchor from, but the greater risk is that we set up our anchors incorrectly or use old anchor material. A small tree can be very strong, but if you rig wrong, it doesn’t matter.
Sometimes you’ll find webbing or slings left on trees by other climbers. Be sure to thoroughly inspect the old anchor setup before trusting your life to it. Replace if at all in doubt.
Carrying a long 40-50 foot length of webbing gives you many more options if the trees are set back from the edge of the cliff. It’s worth packing along if you climb much in forested areas.
Once you find your tree, there are numerous ways to rig it depending on the situation. I can’t cover every scenario here, but I’ll give you some basics. Just be sure you rig the anchor as low on the tree as you can so you don’t leverage the tree out of the ground. The lower your anchor, the less force is applied to the tree.
My preferred ways to tie off on a tree are listed here.
Basket hitch with an overhand
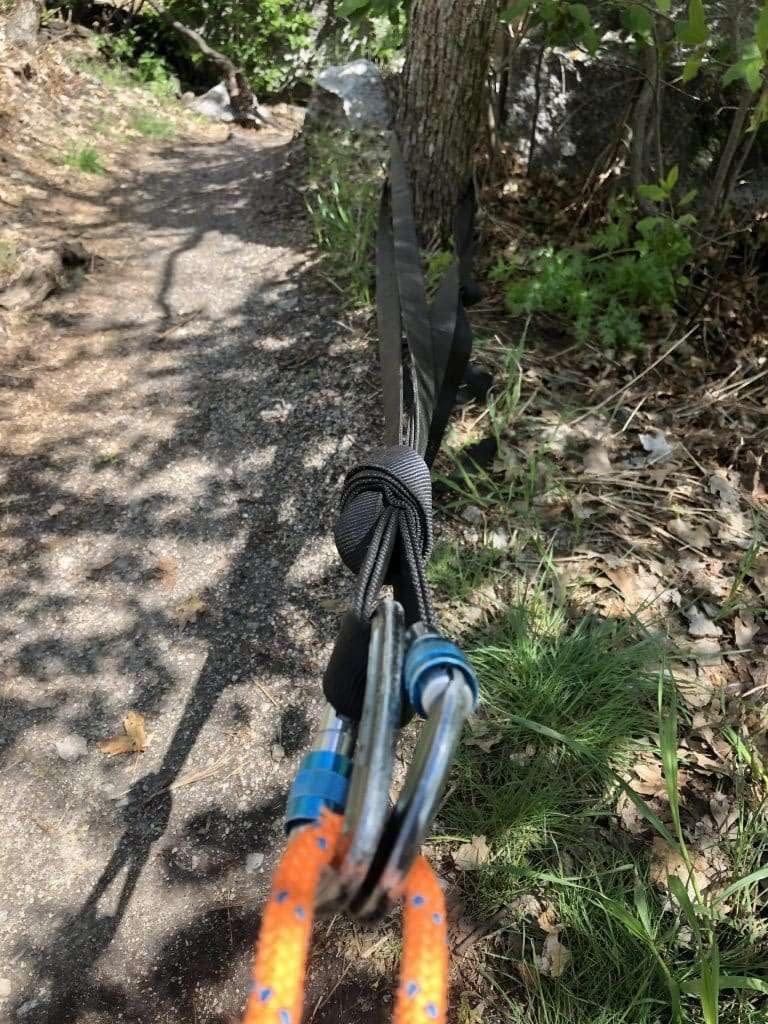
A basket hitch is an easy way to rig a tree. Simply wrap a loop of webbing or rope around the base of the tree, pull the two loops in a V in the direction of pull and tie an overhand or figure eight knot in them to form a master point.
This effectively doubles the strength of the webbing or rope and is redundant through and through.
You can also use a girth hitch if needed, but I typically avoid it because it cuts the strength of your webbing roughly in half.
Wrap two pull one
The wrap two pull one is one of the strongest ways to rig webbing to single-point anchors and is regularly used by rescue teams because of its strength. It requires a bit more webbing but it’s not only much stronger, but it also protects the tree better and does not load the knot much at all, making it easier to untie.
To rig this anchor, double the webbing over and wrap it around the tree two times and tie it in a loop with a water knot. Grab a doubled strand of webbing and pull it toward you to take the slack out. Clip your biner to the doubled strand. You don’t have to double the webbing if you’ve got another anchor point in your system. If you don’t double and you don’t have another anchor point, the wrap isn’t redundant.
Double over the webbing and it becomes redundant. You’ve got to have a relatively long piece of webbing to do this, but redundancy is your friend. You don’t need to tie a knot in the pulled strands as it will do nothing to add strength or redundancy to the anchor.
Tensionless hitch
The tensionless hitch is great because it maintains 100% of the strength of the rope and doesn’t load any knots. To set it up tie a figure eight on a bight in the end of a static rope. Wrap the tied end of the rope around a tree several times to create enough friction so the rope won’t slip. Secure it by clipping a biner through the figure eight and around the load strand of the rope.

All of these methods can be used on single trees or rocks so long as the tree or rock is solid and secure.
If you’re tying to a pine tree, be mindful that tree sap can damage ropes and webbing. I avoid pine trees for this reason, but if you must, be sure to use material that you don’t feel too bad about discarding in the near future.
Multi-point anchor on trees, or other features
If you’ve got multiple features to tie to, use them to create more redundancy. I don’t like to tie into two weak trees and pretend I’m safe because together they would equal one strong tree. Find solid anchors to start with and back them up with redundant strong anchors where possible.
Tying into multiple points is the same as single points, but you have to join each anchor point together into one main master point. This typically requires more webbing, rope, or cord to keep the angles right.
To connect two or more anchor points, run each single anchor point webbing or cord to where you want the master point to be and in line with the direction the climber will be pulling on the rope from and then tie all the cords together with an overhand or figure eight knot to form one master point.
Master point position
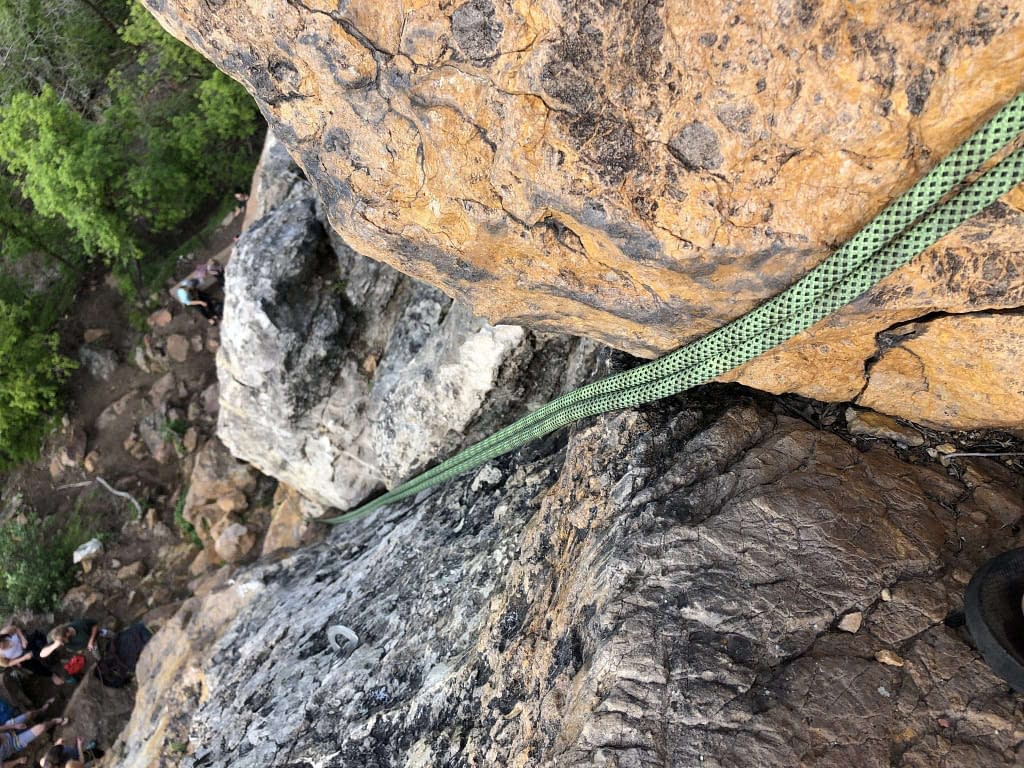
When setting your anchor, be sure to position your master point correctly to reduce rope drag and ensure your carabiners are safe from breaking or opening. This means the master point will need to hang over the cliff edge so the biners don’t get loaded sideways on the rock and so the rope goes as straight down the route as possible. Sometimes this is tough on angled routes or where there’s an overhang in the middle of a route. In those cases, you may unavoidably end up with spots where the rope drags against the rock.
Be very mindful of these spots!
You can’t always avoid them, but when they’re present you should be prepared to protect the rope from dragging across the rocks. You don’t want to lose your rope and you don’t want to lose your life.
Rigging the rope
Once you get the master point dialed, you can rig your rope. Use two locking carabiners set opposite and opposed. Two biners provide more surface for the rope to move across which reduces the wear and friction on the rope. Clip the rope into the two biners in roughly the middle of the rope and toss each side down to the ground yelling “Rope” and looking for anyone in the way before each toss.
Make sure each end of the rope makes it all the way to the ground. If they don’t, pull it up and toss it again. Make sure you lock both biners!
Protecting the edge
Carpet, fire hose, garden hose, towels, backpacks, rope bags, wood, newspaper, floor mats, shoes. These are all items I’ve seen used to protect the rope from running over sharp rocks at the edge of the cliff.
Anything goes, but some methods work better for me than others. I’ve never found the need for commercial rope protectors, but they do exist.
I usually use my rope bag doubled or tripled over and clipped into the master point from the shoulder strap with a biner. This way I don’t have to bring anything extra with me.
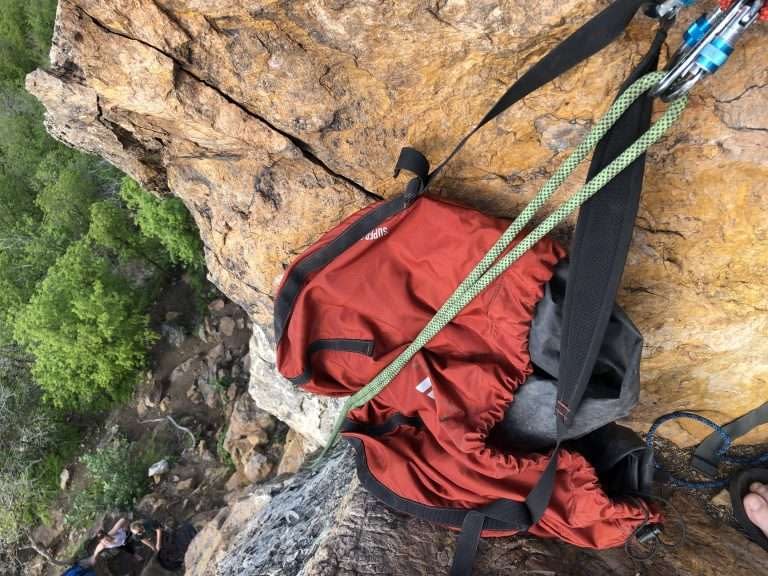
Just be certain that your rope doesn’t run over a sharp or jagged edge that will cut or fray it. When you’re top-rope climbing, the rope yo-yos up and down enough that even a little bit of rough edge can deal a catastrophic blow to your rope.
Sometimes the easiest solution to rope drag is to rig a new anchor. That’s one reason having many options in your toolkit is a plus.
Setting up to climb
Now that you’ve got a safe and solid anchor rigged, it’s time to head back down to the base of the cliff to tie in and get climbing.
Before you head down, double-check every knot and biner to ensure the system is rigged properly and secured. Also, double-check that the rope is positioned correctly.
I usually leave the safety anchor rigged so I can easily move to a new route or pull the anchor safely, but if you’re at a crowded crag, it may be wise to pull it so it doesn’t get stolen by someone who thinks it was forgotten or get in other people’s way.
Once you get to the base of the cliff where the end of the rope is, it’s time to swap out your approach shoes for your climbing shoes, put on your chalk bag and tie in.
Tying in to the rope
To tie into the sharp end of the rope, the most common knot is a retraced figure eight. For top-rope climbing, there’s really no reason to tie any other knot, but there are several other knots you can learn as you progress to other types of climbing.

To learn how to tie in, watch this video:
You’ll also want to be sure to tie a stopper knot (a figure 8 or an overhand on a bight will work great) in the belayers end of the rope to prevent it from accidentally running through the belay device if the route is too tall for the rope you’re using. I often tie my rope directly to my rope bag for this reason.
Now, we’re almost ready to climb, but before we go on belay, I want to discuss the physics of top-rope climbing so our discussion of how to belay will make more sense.
Belaying
Belaying just means backing someone up. In top-rope climbing, two different belay positions can be used. One is to belay from the top of the route and belay your partner from above. The other is to belay pulley-style from the ground, with the rope running in an inverted V up to the anchor and back down to the climber. This slingshot style is the more popular top rope belay method because both partners start and finish on the ground.
(Learn even more about how to belay here.)
Setting up top rope belays
There are two ways to set up belays for top-rope climbing – from below and from above. Belaying from below is the most common method so we’ll start there.
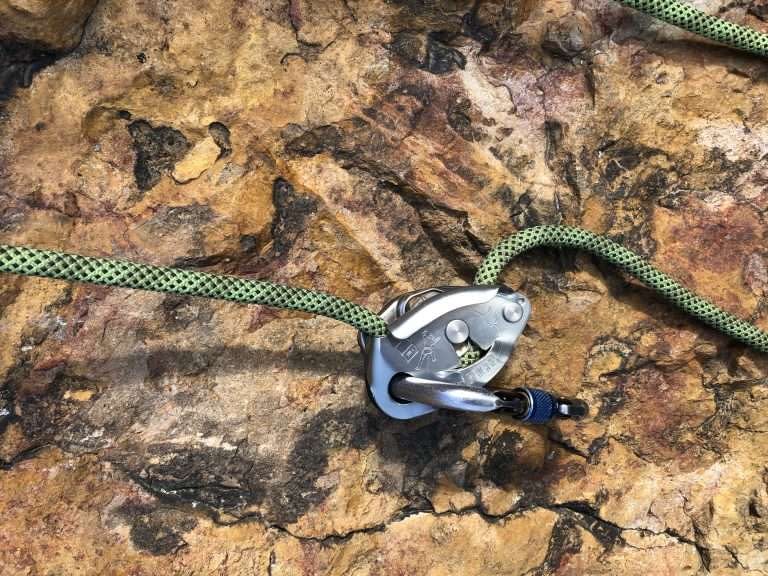
You can get all kinds of belay devices. The one I recommend is the Grigri or other assisted braking device. These are great for beginners because they mitigate much of the risk of dropping someone while belaying. I’ll explain how to use one of these, but the basic principles apply to any device.
It’s friction that makes belaying work. With the Grigri, it’s also a camming action inside the belay device that locks off the rope. Friction is the main force that controls the descent.
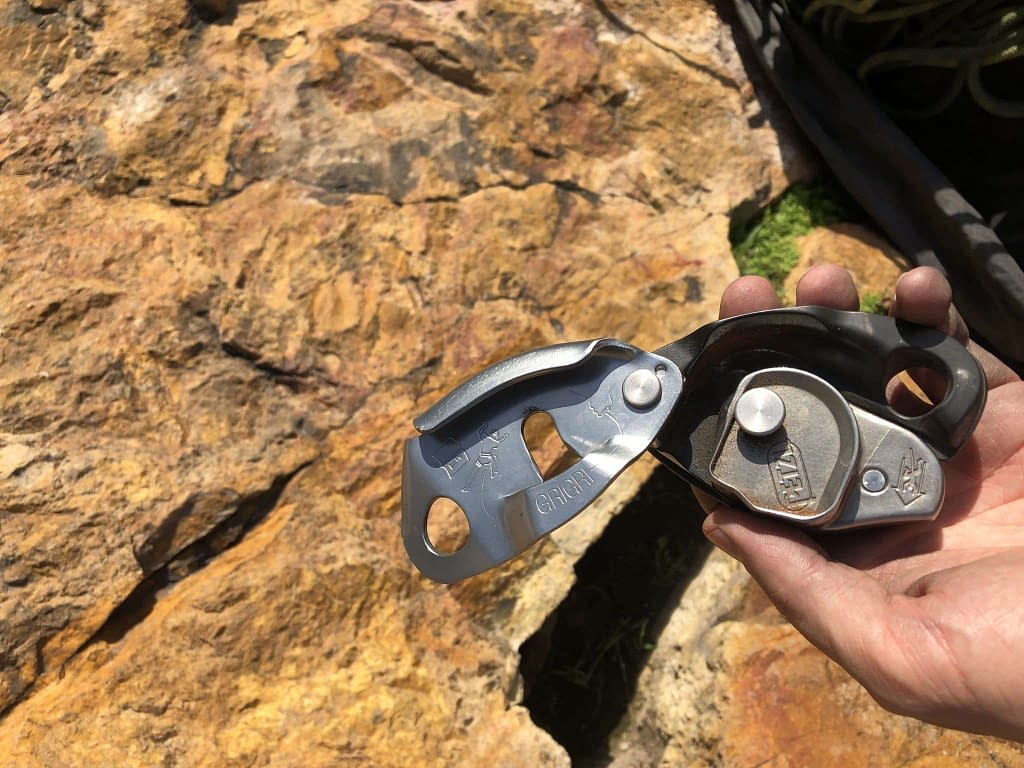
To set up the Grigri, open up the plate and load the rope in following the icons printed on the plates. Close the plate and clip a biner through the hole and through your belay loop. Lock the biner.
I prefer to wear gloves while belaying, but this is a personal preference.
Belaying from below
Belaying from below is pretty straightforward. This is what you do at the climbing gym. Run the rope through the anchor so both ends touch the ground. The climber ties into one end of the rope and the belayer connects the belay device to the other side and pulls the rope down through the belay device to keep it taught throughout the climb.
Belaying from above
Belaying from above accomplishes the same thing, but the belayer starts on top of the cliff and the climber starts climbing from the bottom. The rope runs straight up from the climber to the belayer and the anchor at the top. The belayer pulls rope up from below to keep the system tight as the climber ascends.
Either method of belaying requires similar techniques, the main difference is the direction in which the rope comes into the system. The simplest belay from above uses an assisted braking device like the Grigri. With an anchor above your waist, clip the Grigri to the master point and run the brake strand through a carabiner clipped into the shelf of the anchor. This will allow you to run the grigri as normal and will give you the control you need to lift and lower.
PBUS – Pull, Brake, Under, Slide
The first rule of belaying is to never take your brake hand off the rope! The PBUS method of pull, brake, under, slide, is the generally accepted way to accomplish this safely.

Pull
Pull down on the climber’s rope with your guide hand – your non-dominant hand and the one on the opposite side as the brake. At the same time, pull out with the brake hand to get the slack through the belay device.
Brake
Put the brake strand down in front of you in the brake position. This bend puts friction on the rope at the belay device that will hold the rope tight.
Under
Move your guide hand to the brake strand under your brake hand and firmly grasp the rope.
Slide
With your guide hand now firmly on the brake strand, slide your brake hand up the brake strand without removing it from the rope. Slide until it’s a few inches from the belay device. Now move your guide hand back to the climber’s strand for another pull.
Repeat as needed to keep slack out of the system.
Here are a few tips to make belaying easier for you.
- Little movements are better than big ones. Unless you’re an orangutan with gigantic arms, trying to pull too much slack at once doesn’t work well. Just pull a foot or two at a time.
- When the climber first starts off the ground or when she is exposed to a dangerous fall, keep the belay tight to keep rope stretch low. Do this by sitting into the belay and choking up as tight as you can on the rope.
- Use an experienced backup belayer who can hold the brake strand while you’re learning this.
- Always keep an eye on your climber. Anticipate her movements and be ready if she falls.
Belayer rope management
The belayer is responsible for keeping the rope tight but for taking care of the rope below the belay device. As you pull slack you’ll end up with a big pile of rope that will need to be quickly deployed when the climber lowers.
Managing the rope is critical to keeping everything flowing smoothly, keeping everyone safe, and ensuring the rope doesn’t get damaged.
The first rule of rope management is to keep the rope clean. Use a rope bag or tarp to pile the rope onto. This keeps it out of the mud, dust, and weeds and will also keep it in a nice pile where people are less likely to step on it.
The second rule is to never step or stand on a climbing rope – especially one that’s in use.
As the climber ascends, you may have to move around a bit to keep the rope between you and the anchor out if his way. Move left, right or backward as needed to keep the rope from interfering with the climber. It’s a pain to have a rope rubbing across your face or shoulder right when you’re trying to pull the crux.
Top rope physics
Understanding the physics at play while rock climbing goes a long way to keeping you safe. A few key forces are worth exploring.
Forces in bottom belays
The first is the pulley forces applied on the top rope anchor when using the bottom belay or slingshot belay.

When the rope runs from the ground up through a set of biners and then back down to the climber, an inverted V is formed. The reason this system works is that the weight of the belayer, with help from friction within the system, offsets the weight of the climber. This means that the sum of the weight applied from each side of the rope ends up pulling on the anchor.
That can add up to quite a bit of force on the anchor if the belayer isn’t paying attention and lets slack in the system. If a climber and belayer each weigh 200 lbs and the climber takes a fall with few feet of slack in the system the sum force may jump up to 1500 lbs.
If the belayer is doing his job and keeping slack out of the rope, the same 200 lbs climber taking a fall will only put about 750 lbs of force on the anchor.
Both the climber and the belayer are pulling on the anchor in the same direction and a force applied by one requires an equal force applied by the other.
Forces in top belays
Another scenario to be aware of is when you’re belaying from the top. This isn’t as common, but some routes overhanging a river or other obstacle or routes longer than half your rope require a top belay. In a top belay setup, the friction tends to be less and the rope is a bit harder to manage due to different angles in the rope at the belay station. Especially when lowering, the belayer needs to ensure the weight of the climber is hanging on the anchor, and not the belayer or you’ll be fighting to hold on to your stance at the top of the route while your climber falls or lowers.
Because of the forces exerted on the belayer and the precarious stance on top of a cliff, a top belayer should always be anchored in using either the climbing anchor or another anchor more conveniently located for belaying from above.
Rope Stretch
Many climbers use dynamic ropes to top-rope climb on. This is fine but you need to be aware of the risks involved so you can mitigate them.
Dynamic ropes stretch. Most stretch in the area of 10% in top rope static elongation situations. This is good to reduce the shock to the system when a climber falls but can cause problems when top-rope climbing.
Imagine a climber 15 feet up a top rope route that’s about 100 feet. The rope runs double the length of the route in a bottom belay so 185 feet of rope is out. A 10% stretch equals about 18 feet.
Considering that the climber is only 15 feet up, he may have a painful landing on the deck if he falls.
While the risk of him actually slamming the deck is low because the rope will catch much of the force, rope stretch is important to pay attention to.
An easy way to prevent this is to preload the rope so it’s already stretched out. Do this by having the belayer choke up as high as she can on the rope and then sit into it with all her weight. This will stretch out the rope so it’s tight and will limit the risk of a big fall.

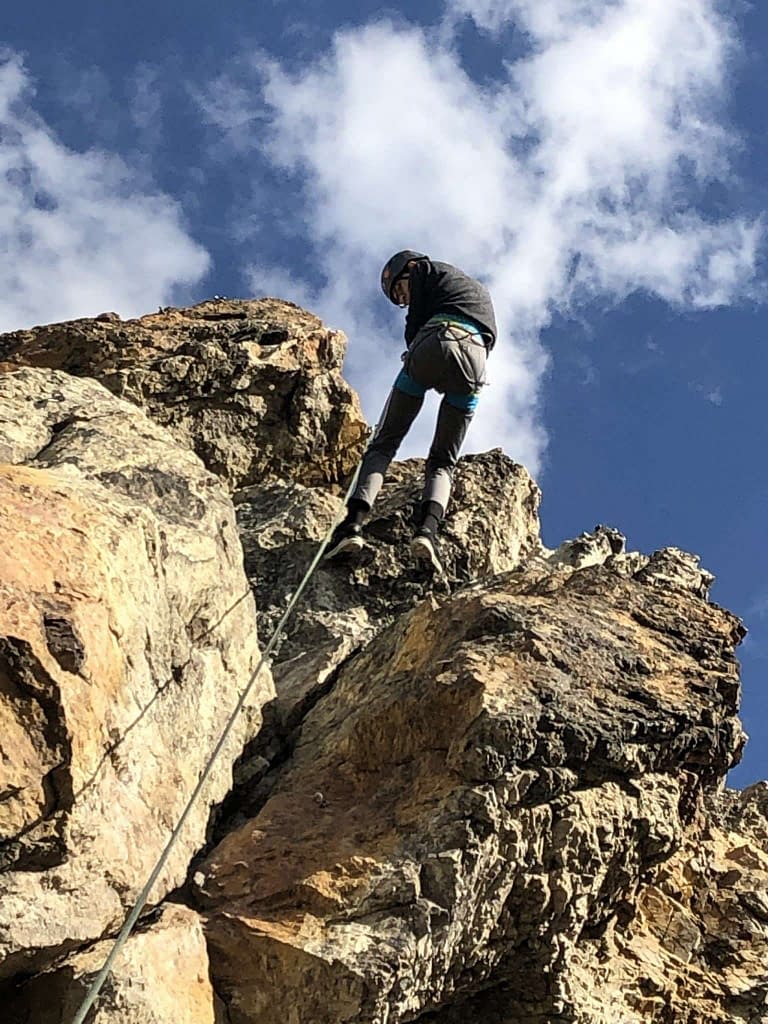
Topping out
Once the climber gets to the top of the route, she’s got to get down. I’ve seen people pull themselves up over the edge and walk off, but the easiest and most common way to get back down once you get up is to have the belayer lower you on the rope.
I’ve seen many first-time climbers freeze up when it comes time to look back down and put all their weight on the rope and harness. To prevent panic attacks at the top of a route, I like to have first-time climbers stop about 8 feet off the ground and practice lowering.
Lowering from the top can be especially scary the first few times you trust your life to your own anchor-building skills, so I like to test the system out under less risky conditions closer to the ground. This also gives climbers a chance to sit on the rope while still within reach of help from below.
Lowering
When lowering from a top rope route, once the climber reaches the top, they can yell to the belayer to take in the slack. Once the rope is tight, the climber will sit back into her harness and put her feet on the wall in front of her about shoulder-width apart.
As soon as the climber is ready to be lowered, they yell to the belayer “ready to lower” and the belayer starts to slowly feed out rope keeping a close eye on the climber and on the rope coming into the belay device.
Watch the climber to ensure you don’t drop them too fast into a ledge. Watch the rope to ensure no kinks or twists get caught in the belay device.
Sometimes climbers try to grab onto the rope on the belayer’s side of the anchor. If they’re trying to do this, I have them grab the tie in knot in front of them, but normally climbers just keep their hands free when lowering.
Keep lowering the climber until they’re safely on the ground before coming off belay.
Never use a bolt hanger, chain link or rappel ring to lower from. Only lower through your own biners or rapid links. It’s bad form to use the chains to lower from. It will wear out the bolts and chains prematurely.
Cleaning the anchor
After everyone’s had their turns climbing a route, you’ll need to clean the anchor. This can be done in a number of ways.
The easiest way when top-rope climbing is to climb the route, get on top of the cliff, clip into the safety anchor, untie the rope, and unclip the anchor. The belayer can start packing up the rope while you pull the safety anchor and walk back down to the base.
If you don’t want to walk off the top, you can also rappel, but since this post is already monstrous, you can read this post on how to rappel safely.
Safety tips
When you get out on real rock, the responsibility to keep you and your group safe falls squarely on your shoulders. Following all the instructions in this article will go a long way in helping you with that, but here are a few more pointers that can help keep you climbing confidently and safely.
Never leave the ground without doing the safety CHECK. This is an acronym I use every time I climb to ensure my partner and I check everything out before loading a rope.
C – Clothing
Ensure your clothing isn’t loose and liable to get stuck in a belay device or get in your way while you’re climbing
H – Helmet, Harness, Hands, Hair (that’s a lot of H words!)
Check your helmet to ensure it’s on and fastened. Ensure your harness is on correctly including doubled back if it needs to be. Check your hands. If you’re belaying, do you want gloves on? Check your hair. Long hair can get stuck in a belay device. Tie it back.
E – Environment
Check the environment for things like excess noise, wind, sun exposure, weather threats, animals, other climbing groups, etc. I like to take a final inventory of my gear on the ground to ensure it’s not going to roll or blow away while I’m tied into a belay and can’t do anything about it. I also use this step to ensure the climber has any gear they may need on their harness for the anchor or to set up a top belay.
C – Connections
Check all your carabiners or other connections to ensure they’re locked, not cross-loaded, or otherwise at risk of not working properly.
K – Knots
Check all the knots in the system including the tie in knot.
When running through the CHECK process, both climber and belayer should check each other. It’s easy for people to get complacent and not check that figure 8 thoroughly. That’s when bad stuff happens!
Other safety skills you’ll want to learn as you get some experience with the basics are listed here but I won’t cover them in detail in this article.
- Learn how to escape a belay
- Understand and learn hauling and mechanical advantage systems
- Learn how to lower or assist a stuck climber
- Add a directional
Additional Resources
So we’ve covered a lot in this article, but it’s by no means a replacement for more hands-on instruction. Also, much of the content here describes “what to do”, but doesn’t provide all the “how to do it” details.
If you’re looking for fitness improvements to make you a stronger rock climber, check out my 19 best rock climbing workouts and my 6-week workout plan
I’m currently creating an online course that will go in-depth on all the skills required to top-rope climb safely and confidently. It’s called Rock Climbing Boot Camp. It will include tons of hands-on practice and evaluations of your work so you can be confident that you’re doing it right. Come visit our courses page to pre-enroll.
In addition to Adventure School resources, try picking up some of these awesome books on climbing:
- -30%

Mountaineering: The Freedom of the Hills
Original price was: $34.95.$24.31Current price is: $24.31. Learn More

You may also find luck with classes taught through local climbing gyms, universities, or outdoor programs.
Top-rope Skills Objectives
After you take a course, whether, in person or online, you should be able to confidently perform all the objectives listed below. The end result should be that you can top-rope climb with a full set of skills confidently and safely. If you already have some top roping knowledge and skills, use this list to identify gaps in your learning ‚ then let me know what you’d like to learn more about and I’ll write something up.
- Describe how to properly select, size, put on, and care for
a harness. - Explain how to select a climbing rope
- Demonstrate how to coil, and care for a climbing rope.
- Explain when to use and demonstrate how to tie a figure-eight follow through, water knot, overhand on a bight, clove hitch, figure eight on a bight, girth hitch, basket hitch, alpine butterfly, munter hitch, and a double fisherman’s knot.
- Demonstrate how to rig and back up a rappel.
- Demonstrate how to rappel competently both double and single-stranded.
- Describe the components of the belay and demonstrate PBUS belaying.
- Know how to bottom belay with an ATC and a GriGri.
- Know how to top belay with an ATC, GriGri, and a Munter
Hitch. - Know the signals used to communicate in bottom belay and
top belay situations. - Know what constitutes a good anchor. Understand the concepts
of vectors, pulleys, multiplication of loads, equalization,
and extension reduction. - Demonstrate how and why to add a directional to a system
- Demonstrate proper multi-point anchors that include
fixed, and removable anchor points for solid top rope anchors. - Demonstrate basic climbing movement.
- Know what equipment to purchase for top roping.
- Demonstrate an understanding of the risks encountered in
top roping and how to mitigate each one. - Know how to select and manage a safe top rope site.
- Know how to use a guidebook or beta site.
- Understand the YDS rating system.
- Be able to identify various rock features.
- Understand cliff etiquette.
- Understand Leave No Trace Ethics
- Demonstrate how to escape a belay
- Demonstrate how to use hauling and mechanical advantage systems
- Know how to lower or assist a stuck climber
I hope you’ve learned something and enjoyed reading this guide. If you have any questions or additional thoughts on top-rope climbing. Please drop me an email or leave a comment below. If you know anyone else who’d like to get into climbing, forward this along to them.
Oh, and if you want a bit of fun top rope entertainment, check out this video
Until next time…
Safe, smart, and confident adventures to you.
-Chris

- A typical top rope climbing session:
- Top rope equipment
- Finding and accessing top rope routes
- Setting a safety anchor
- Setting a top rope anchor
- Principles of anchors
- Types of anchors
- Bolts
- Quad
- Draws
- Slings
- Single point anchor on a tree or large rock
- Basket hitch with an overhand
- Wrap two pull one
- Tensionless hitch
- Multi-point anchor on trees, or other features
- Master point position
- Rigging the rope
- Protecting the edge
- Setting up to climb
- Tying in to the rope
- Belaying
- Setting up top rope belays
- Belaying from below
- Belaying from above
- PBUS – Pull, Brake, Under, Slide
- Belayer rope management
- Top rope physics
- Forces in bottom belays
- Forces in top belays
- Rope Stretch
- Topping out
- Lowering
- Cleaning the anchor
- Safety tips
- Additional Resources
- Top-rope Skills Objectives


