What knot should I use?
Ever needed to tie a knot and had no idea which one to use so you ended up tying this granny knot…

or this knot you made up yourself by wrapping the rope around a bunch of times hoping it will hold…

or any other knot that you didn’t fully trust would hold tight and not be impossible to untie?
You should have used a bowline instead!

Bowline knot
The bowline is a simple but secure knot that won’t slip or untie and can be easily untied after being weighted. If you don’t know how to tie a bowline, you’ve come to the right place.
Bowlines are versatile knots that can be used in various situations. The bowline is one of the most universally useful knots. Its sometimes called the king of knots.
With the right modification, the bowline is also a great knot for rock climbing or mountaineering.
Learn it and commit it to memory and you’ll be a happy camper next time you need to tie your tarp around a tree or hang your hammock.

The bowline works by forming a non-constricting loop at the end of a rope. It’s great for when you need to attach a rope around an object like a tree or a boat dock.
I learned the bowline as a rescue knot for tying a loop around a person’s body to help lift them out of a predicament. I’ve never actually used the bowline to rescue anyone but I have used it to tie a rope to the bumper of a stuck car to tow it out.
Bowlines are easily untied after being heavily loaded. That’s why I used it to pull the car out. Other secure knots would have cinched down way too tight to easily pull apart afterward, but the bowline just slid apart with ease.
Tying the bowline isn’t hard and methods abound in tying it, but my recommendation to you is to learn one method that’s easy for you to remember and forget about all the other methods. Some of them are just party tricks that aren’t practical in real life.
One-handed bowline method
Here’s one method to tie the bowline. I tie it this way almost every time.
Grab the loose end of a rope looped around whatever object you’re tying to in your dominant hand (my right hand).

Put the loose end over the top of the standing end (I usually grab the looped rope with my pinky).

Curl your wrist down around the standing end.

Flip your wrist back up on the other side (side closest to you) of the standing end to wrap the end back through the loop you made.

Wrap your hand back behind the standing end from the same side as the hand you’re tying with.

Bring the loose end around and reposition your hand on the rope after you’ve passed it behind the standing end. You have to let go of the rope for this step, so be sure to have a grip on the end coming around the back before you lose control of the rope.

Pull the loose end back out through the loop of rope around your wrist
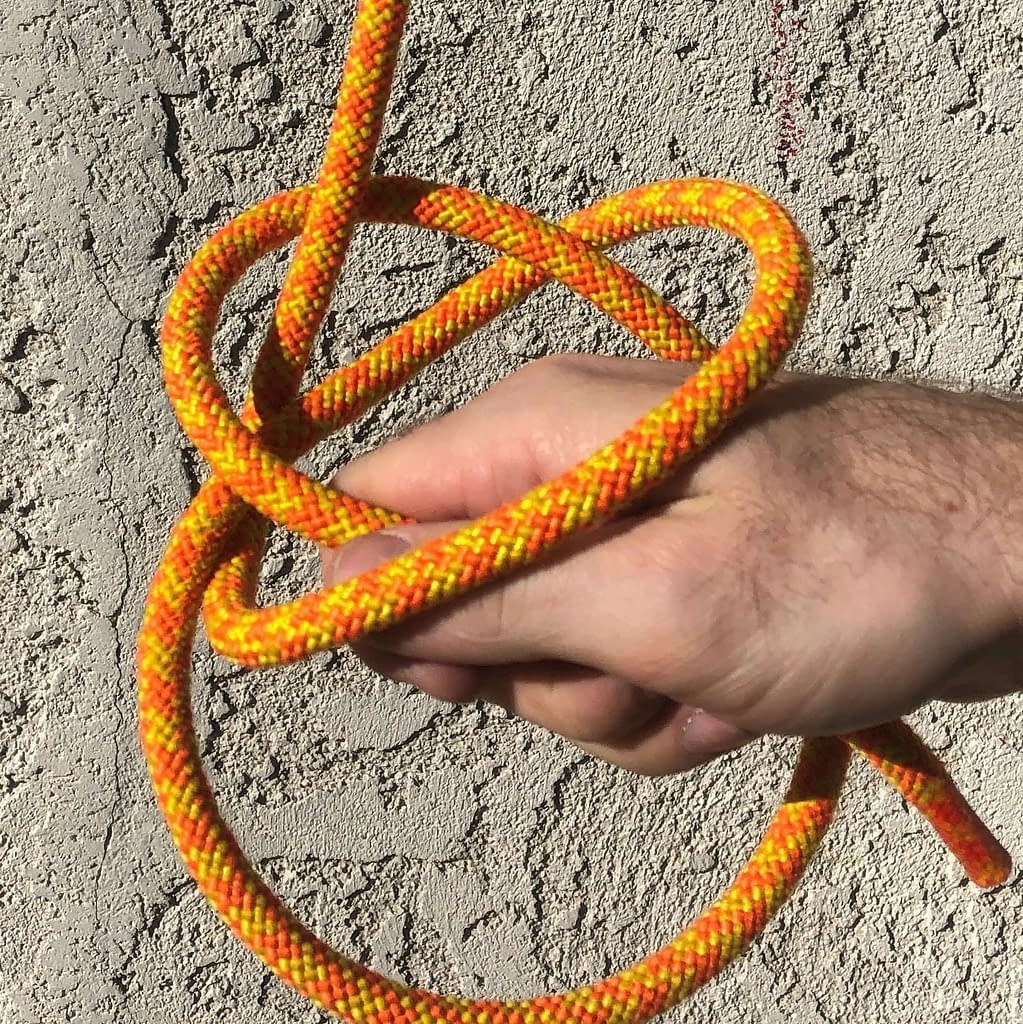
Carefully pull the loops tight.


That’s the one-handed bowline. Learn it and practice it until you can tie it upside down and backward so you’ll be confident you can tie it properly when you really need it.
Here’s an animated version if you didn’t get the one-handed bowline method from my photos.
Bowline variations
For many applications a basic bowline is sufficient, but know that the bowline isn’t a secure knot on its own since the loose end can slide out of position if the knot comes untensioned. This normally isn’t a problem, but for critical applications like rock climbing or rescue, it’s a no-go.
To fix this some people tie a stopper knot. You can do this, but it’s not the best way to secure a bowline.
I use a simple variation called Scott’s simple lock bowline. Many other variations exist, but the basic bowline and Scott’s simple lock are the only ones I use routinely.
Scott’s simple lock bowline
Scott’s simple lock is a bowline that can be used for any kind of situation. I trust my life to it when I use it to tie in during rock climbing and it’s way easier to untie after a big fall than a figure 8 knot.
To lock the standard bowline with Scott’s simple lock, you just need to run the free end of the rope on a finished bowline back through the body of the knot like this:


Okay so now you have the basics of how to tie the bowline and how to tie it securely for critical-use situations such as rock climbing or mountaineering. Go practice and don’t ever tie a useless made-up knot again.
For an in-depth understanding of this and other knots, check out this resource.
If you’ve got other variations or uses of the bowline, share below in the comments.
– Chris
Learn more useful knots and skills for rock climbing or other outdoor activities.


